Recreating a folding corner effect with cel animation

,
The previous post about 24 Ways (designed by Paul Robert Young) looked at how they reduced HTTP requests by embedding the XML code for an SVG sprite in a stylesheet using base64. I want to continue in this post by reverse engineering the process of getting from SVG code to the animated folding corner effect.
Skip to navigationThe folding corner technique
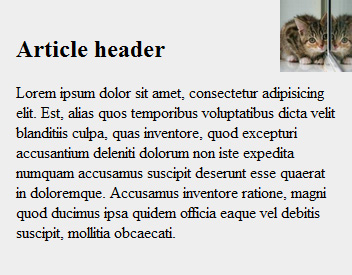
First, a recap of what we're looking at:

On a desktop, when the mouse hovers over an article summary, the top right corner appears to fold, revealing the author's profile picture (Figure 1). As I discovered in the previous post, this is achieved using an SVG image, which has been disguised in CSS using base64. We can see the image in Figure 2:
When you see this, you get an idea of how the effect is achieved. It's not by fancy trigonometry and programming; it's by replacing each triangle successively using CSS animation. We'll look at this in detail below, but first let's recreate this effect from scratch.
Skip to navigationSetting up the DOM
The bare bones of the article summaries are highly semantic HTML. Each summary is modelled as a <li> with class="summary". This contains an <article>, which in turn contains three clear sections, a <header>, a <div> for the main content, and a <footer>. Inside the footer is a <p> with class="summary__author", which contains an image of the author. For our purposes, here's the essential markup:
<!-- HTML -->
<li class="summary">
  <article>
    <header>...</header>
    <div>...</div>
    <footer>
      <p class="summary_author">
        <img src="profile-pic.jpg" alt="Author pic.">
      </p>
    </footer>
  </article>
</li>Positioning the parent
The .summary element has styles which make it look like a card: width, padding, background colour, and so on. These may vary from one project to another. But, for the folding corner to work, the most important thing we need to do is set position: relative. Why? Later, we'll want to start moving child elements around inside the summary, and as we know from CSS positioning 101, we can do this by giving the parent position: relative and the child element position: absolute.
/* CSS */
.summary {
  /* These styles are simply cosmetic */
  width: 25%;
  background: #eee;
  padding: 1rem;
  /* This is where the magic begins */
  position: relative;
}Child support
Now we need to move the author's profile picture to the top-right corner. This is easily done using position: absolute on the element that contains the image (not the image itself), and by setting the top and right properties to 0. We'll also get rid of any nasty default margins.
/* CSS */
.summary__author {
  /* This is the container of the img, not the img itself */
  position: absolute;
  top: 0; right: 0;
  margin: 0;
}
We also need to set the dimensions of the image. This could be any size, but let's make it big enough to see the image, but not so large that it dominates the summary. Let's make it 4.5rem. This number's important; we'll see why later.
/* CSS */
.summary__author img {
width: 4.5rem; height: 4.5rem;
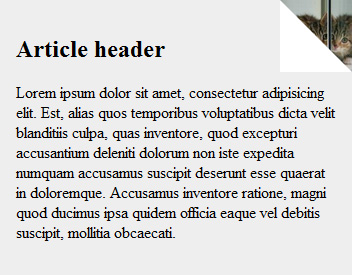
}The image will grow or shrink to the dimensions set here. Figure 3 shows what we've got so far:
The before and after
The folding corner effect utilises the ::before and ::after pseudo-elements of .summary__author. The trick is to cover the top-right half of the author image with the leftmost triangle in our SVG (Figure 2). The bottom-left half of the author pic is permanently covered with a generic triangle, which we'll draw using a border hack.
Starting with the bottom-left corner, we'll use the ::before pseudo-element. First, let's make it visible using content: " ";. This is just empty content which tricks the browser into displaying the pseudo-element. We want to control where it appears; we'll do this again using position: absolute, and top: 0 and right: 0. Then, we add a border. The border must be half the thickness of the image:
4.5rem ÷ 2 = 2.25rem
Now, we set the top and right border colours to transparent, and the bottom and left borders to white. When a transparent border meets a coloured border, it creates a triangle (don't ask me, I just work here). So these are the styles we've just added:
/* CSS */
.summary__author::before {
/* Make pseudo-element appear */
content:" ";
/* Move it to the top right */
position:absolute;
top:0; right:0;
/* Paint a white triangle on the bottom-left half */
border:solid 2.25em;
border-color:transparent transparent #fff #fff;
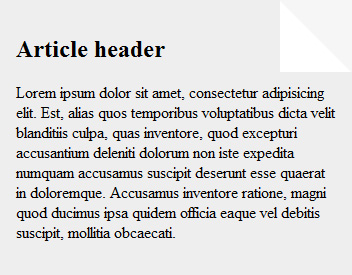
}Figure 4 is the result:
The top-right part of the image is covered by the ::after pseudo-element, which contains our SVG sprite. It is positioned in a similar way to what we've seen, although the size is that of the full image (4.5rem). We also have to add the background in the form of the base64-ified SVG/XML code, as described in the previous post. The background property takes in the following parameters: image, left offset, top offset, repeat. The left offset is set at -0.5em. Remember content: " ";? The space character has a width of 0.5em, and we need to compensate for this by shifting the background to the left. Here's what we have:
/* CSS */
.card__author::after {
  /* Make pseudo-element appear */
  content:" ";
  /* Shift to top right of parent element */
  position:absolute;
  top:0; right:0;
  /* Set dimensions to the same as image */
  height:4.5em; width:4.5em;
  /* SVG background with 0.5em offset to the left */
  background:url('data:image/svg+xml;base64,PHN2ZyB3aWR0aD0iODg
  wIiBoZWlnaHQ9IjcyIiB4bWxucz0iaHR0cDovL3d3dy53My5vcmcvMjAwMC9z
  dmciPjxwYXRoIGQ9Ik03IDBoNzN2NzNsLTczLTczeiIgZmlsbD0iI0Y2RjZGN
  iIvPjxwYXRoIGQ9Ik04NyAwbDY1LjggNy4yIDcuMiA2NS44LTczLTczeiIgZm
  lsbD0iI0U5RTlFOSIvPjxwYXRoIGQ9Ik0xNjcgMGw1Ny44OCAxNC40IDE1LjE
  yIDU4LjYtNzMtNzN6IiBmaWxsPSIjRTBFMEUwIi8+PHBhdGggZD0iTTI0NyAw
  bDUwLjY4IDIxLjYgMjIuMzIgNTEuNC03My03M3oiIGZpbGw9IiNENkQ2RDYiL
  z48cGF0aCBkPSJNMzI3IDBsNDQuMiAyOC44IDI4LjggNDQuMi03My03M3oiIG
  ZpbGw9IiNjY2MiLz48cGF0aCBkPSJNNDg4LTFsMjguOCA0NC4yIDQ0LjIgMjg
  uOC03My03M3oiIGZpbGw9IiM5MDAiLz48cGF0aCBkPSJNNTY4LTFsMjEuNiA1
  MS40IDUxLjQgMjEuNi03My03M3oiIGZpbGw9IiNBNTAwMEIiLz48cGF0aCBkP
  SJNNjQ4LTFsMTQuNCA1OC42IDU4LjYgMTQuNC03My03M3oiIGZpbGw9IiNCMz
  AwMTkiLz48cGF0aCBkPSJNNzI4LTFsNy4yIDY1LjggNjUuOCA3LjItNzMtNzN
  6IiBmaWxsPSIjQkYwMDI2Ii8+PHBhdGggZD0iTTgwOC0xdjczaDczbC03My03
  M3oiIGZpbGw9IiNjMDMiLz48L3N2Zz4=') -0.5em 0 no-repeat;
}
Now, our profile picture is hidden (Figure 5). The next step is to reveal it when the mouse hovers over the article summary.
Animating the corner
The folding corner technique on 24 Ways uses cel animation. What's that about? In contrast with digital animation, which I guess involves complex mathematics to model objects and motion in 3D or 4D space, cel animation is fairly simple. It involves creating a series of images, each slightly different from the previous one, and then flipping through them at such a speed that the human brain is tricked into seeing one continuous, smooth action. I found this short example on YouTube to illustrate: Ninja Run. The folding corner on 24 Ways uses nothing quite as fancy as the ninja image. It's a series of triangles with the apex nudged a little bit each time (see Figure 2, above).
Going from this image to the folding corner animation requires some CSS trickery. The technique involves sliding the background image from left to right, just like a film reel. We can set up a @keyframes animation to do this:
/* CSS */
@keyframes corner-forward {
  from {
    background-position:-0.5em;
    z-index:0;
  }
  to {
    background-position:-50.5em;
    z-index:2;
  }
}
Where do these numbers come from? Again, the background position needs a -0.5em offset to compensate for content: " ";. We've already set the width of each cel to 4.5rem, and there also happens to be a gap of 0.5rem (six pixels) between each cel in our SVG file. That gives us 5rem per cel. There are 10 of them (not including the first), so the total background needs to be shifted by:
-0.5em - 10 × (4.5em + 0.5em) = -50.5em
Why the z-index? In my example, the text in the summary header is well clear of the profile picture. However, if the text overlaps the picture, there's a problem because the text will always be under the profile image. If you think about writing on a piece of paper, you have the paper underneath, the writing over the top, and the fold will be at the top level. When we animate the folding corner, we can fake this by including the z-index in the animation. We should also add a rule for the header: .summary__header {z-index: 1}.
All that remains is to attach this @keyframes rule to the ::after pseudo-element, and we want to do this when the mouse hovers over any point on whole summary. How good is this?
/* CSS */
.summary:hover .summary__author::after {
  animation: corner-forward 0.15s;
}
As it stands, we'll see our SVG triangles appear to slide smoothly from left to right, but that's not what we want. We need each cel to appear, then immediately flip to the next. We can do this by adding the steps() property to the animation:
/* CSS */
.summary:hover .summary__author::after {
  animation: corner-forward 0.15s steps(10);
}
Lastly, when the animation ends, the default behaviour is to revert to its initial state. However, we want the animation to pause at the end for as long as the mouse is hovering over the article summary. To do this, we add animation-fill-mode: forwards.
/* CSS */
.summary:hover .summary__author::after {
  animation: corner-forward 0.15s steps(10);
  animation-fill-mode: forwards;
}
I created a CodePen to demonstrate this. It's fun see it working in slow motion; try changing the animation property to corner-forward 10s steps(10).
Performance, progressive enhancement and accessibility
All told, the minified CSS for this, including the base64-ified SVG, weighs in at 1.8KB. Gzipping would compress this even further, so it doesn't add a huge amount to the file size. If you add -webkit- prefixes to the animation, the technique works across most browsers (I've tested it in recent versions of Firefox, Chrome and IE), and as I found in my previous post, SVG support is pretty widespread these days, with only IE8 letting the side down.
In terms of accessibility, this is nothing more than a visual flourish, so it shouldn't cause problems for screen readers, and I doubt it would be an issue for users with vestibular disorders. One thing to consider is that it does depend on mouse input (thanks to .summary:hover), so keyboard and touch users won't gain any benefit from it.
NOTE: In order to get this working for keyboard, I tried adding tabindex="0" to <li class="summary">, and then changing the CSS for the animation:
/* CSS */
.summary:hover .summary__author::after,
.summary:focus .summary__author::after {
	animation: corner-forward .15s steps(10);
	animation-fill-mode: forwards;
}
While this does seem to work, I'm not knowledgeable enough about the accessibility issues that tabindex throws up, so I wouldn't recommend using it.
Conclusion
Recreating this one simple effect has exposed a slew of interesting CSS techniques. It's shown that we can use CSS to mimic classic cel animation without adversely affecting accessibility or progressive enhancement.
In a future post, I'd love to explore other uses for cel animation in web design, but in the meantime I'd be really interested to know if you've seen or created similar examples in the wild. Thanks for reading!
Skip to navigation
Comments
comments powered by Disqus